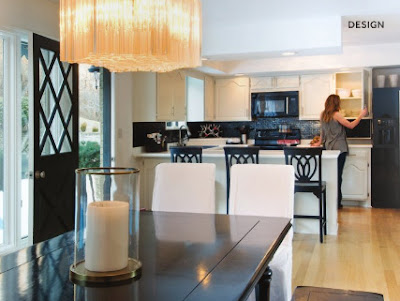
diy details: globe pendant
I was tired of the chandelier-under-a-drum-shade fixture above my kitchen table. But it was still a nice fixture, so I couldn’t really justify replacing it. Then I had this idea that I might be able to transform it into some kind of cool globe pendant. It worked! Here’s how I did it:
1. Take off the drum shade. There is a little nut (heh heh heh – I’m so immature) holding on the shade. Take it off and remove the shade.
2. The drum shade was approximately 18” in diameter, so I purchased 2 quilting hoops of that size. They are a bit bigger and sturdier than embroidery hoops, but I think embroidery hoops would work just as well. Carefully pry the hardware off of the hoops. I pretty much destroyed mine in the process. Blurg. Don’t worry, it’s fixable.
3. Glue the ends together to close up the circle on three of the hoops. Leave the fourth one open. You need to use glue that will hold really well because there will be pressure on these joints. I found that epoxy worked the best. Use wood filler to fix the damage from step 2.
4. Assemble three of the hoops as shown. Clamp. Drill a small hole through all three hoops on one side of the globe. (This is where I needed an assistant… my Dad.) I would recommend separating the hoops again. Measure and mark each hoop where you want the hole to be drilled on the opposite side. The holes need to be equidistant from each other on each hoop. You will need to measure. If you don’t get them lined up, it looks wonky when you put it all together, and you will have to re-drill new holes. Take my word for it. Eye-balling it won’t work.
*** Side Note: Check out my Mom & Dad’s fabulous kitchen!!! You’ll get the full tour one of these days! Stay tuned. ***
5. Paint. I mixed some glossy exterior black latex with some metallic gunmetal grey to get as close as possible to the existing finish on my light. Alternatively, you could just spray paint everything (including the fixture) to make it match.
6. Use a small bolt on each side to hold it all together. Don’t tighten the bolts completely… it is easier to get the globe around the light fixture if you can move the hoops around, and then re-position them again once it is in place.
7. I attached the globe to the existing fixture with a piece of picture-hanging wire looped around each bolt and through the center of the fixture. Hold it in place with the drum shade nut (hahaha). It looks kind of tickety-tack this close up, but it pretty much disappears once the hoops are all positioned. If you measured before you drilled, the globe will balance quite nicely.
8. Add the final circle vertically. (This is the one that I did not glue together.) I threaded it through the inside of the horizontal circle and left it on the outsides of the other two. Once this piece is on, it all holds itself together fairly solidly.
Voila! That’s it! I think I could even adapt it to a different light if I wanted to switch things up.
Success!!! Globe Pendant diy
I’ll post the detailed tutorial tomorrow!
Monday Inspiration
Let’s just move along to the inspiration part ASAP…
I found the Kelly + Olive blog this weekend. It’s awesomesauce. I spent a good chunk of Saturday night browsing through their design boards. I love their style. If you haven’t checked them out already, you have to.
Do you have any projects planned for the week? Need some ideas? Courtney and Lauren of Kelly + Olive have put together this super cute e-book of Ideas You Should Steal. It features project tutorials from 16 design bloggers. You can download it for $1, and all proceeds go to Dwell with Dignity.
Let the week begin!
My New Look {via JoAnn at I’d Rather Be Shopping!}
I complained to JoAnn at I’d Rather Be Shopping about my wardrobe dilemma… too many ‘soft’ clothes (yoga pants most days, jeggings for special occasions.) I know… ick. I used to totally judge stay at home moms who dress like me. I don’t know when I slid into this pattern. But don’t worry… JoAnn has a plan, and I’m so on board with it!
Head over to I’d Rather Be Shopping and see my new looks!!! They are awesomesauce (does anyone else watch Parks?) And if you have any wardrobe questions, ask JoAnn! She’s the best.
I was going to include “before” shot of my outfit today. But hahahaha, um… NO. You’ll see the “afters” once I’ve done my shopping. Which will be soon. Because I totally need some retail therapy right now.
Instead, here’s a picture of my diy globe pendant light because it is looking a lot cooler than I am so far today. I just have to do one more layer of paint, then install!
Best Parts: Rue Issue 4
1. Entire walls of chalk board. (This idea also made my 100 Things list this week!)
Image above is from the home of fabric designer Bonnee Sharp. I LOVE the way she added the gold frames.
This image is part of the studio shared by ‘bash, please’ and Annie McElwain.
2. Midcentury dining sets with large white ball pendants and lots of windows with patterned drapes. Is it just me, or was it kind of weird that Rue featured two such similar rooms this issue??? Whatever. I like them.
Image on left is the home of Bonnee Sharp and image on right is the home of Andy Beers.
3. The block of soft grey chevron to define the entry area and to act as a backdrop for the rustic re-claimed wood shelves. Super cool.
Office space of ‘bash, please’ and Annie McElwain.
4. Huge artwork made up of a bunch of smaller photos.
Another image from the office of ‘bash, please’ and Annie McElwain.
All photos via Rue Issue Four.
Artwork Obsession
Is anyone else obsessing over this painting? I’ve seen it floating around the blogs and I LOVE it! Where can I get it?
I think I feel a painting project coming on…
100 Things: Part 6
For Japan With Love
On Friday, March 18th I will be participating in the “Bloggers Day of Silence” organized by Utterly Engaged and Ever Ours.
If you would like to donate, visit For Japan With Love, where you will find a direct link to the fundraising page for ShelterBox.
ShelterBox was one of THE first organizations asked by Japan to help and were on hand on the Saturday after the quake. Each large, green ShelterBox is tailored to a disaster but typically contains a disaster relief tent for an extended family, blankets, water storage and purification equipment, cooking utensils, a stove, a basic tool kit, a children’s activity pack and other vital items.
Guest Post at Modern Jane
I had no idea it would be so difficult to narrow it down to the three things I love the most at my home! Head on over to Modern Jane today to see what I chose!
White Sofas
Currently I have one oatmeal-y colored sofa and one beige-y colored sofa. They are comfy, but ugly. Some might even say fugly. I’ve been planning to slipcover both of them in white, but this week’s shenanigans have me wondering if my family can handle that.
So… a question for the moms out there (of boys especially)… do any of you have white furniture? Is this a possibility, or a potential nightmare?
image via Ivy & Piper
My House Tour on MADE BY GIRL!
I have pretty much idolized Jen since I started reading blogs. Here are some random reasons...
- daily fabulousness on the Made By Girl blog
- Jen's insanely stylish home... here are some photos of Jen's home from her blog...
- The Made By Girl Shop's collection of prints... I want them all!
- Something new in the works that I am excited to see...
Thanks for featuring my home tour, Jen! It totally made my day!
all photos via Made By Girl
This is what I'm up against...
So, while I was absorbed in watching Jeff and my Dad carefully set the cabinets into place, THIS was going on behind my back...
At least the cabinet was only primed and not painted. But seriously... how many times am I going to have to repeat that "WE ONLY DRAW ON PAPER" before my boys are grown up???
Joann{I'd Rather Be Shopping} Saves the Day!
I think I was having a bit of a 'wish I was Joan' moment when I bought a sexy black pencil skirt to wear to an event on Friday (tomorrow). I should have thought twice when the girls in the boutique could not find a top that looked right with it. I quite possibly have the only body type that does not look good in a pencil skirt. BUT ANYWAYS... I had to have it. So I bought it. Without anything to wear it with.
So as I was touring through the blogs on Monday, I impulsively emailed Joann... her blog I'd Rather Be Shopping is a mandatory read. She knows her fashion, and she's fun! I knew that Joann did reader requests, but I had NO IDEA how awesome she would be about this! (She was even sweet about the crazy pics I sent to her of myself in the skirt... she complimented my legs and said nothing about my
Joann totally went above and beyond! She pulled together not only one, but THREE fabulous looks for me! Accessories included! Go see them... she posted them today on I'd Rather Be Shopping!
THANK YOU JOANN!!!
Another One for the Inspiration File
My favorite part was the feature on the amazing home of Culley Ingram in Nashville. This is a family home that manages to looks comfortable and fabulous at the same time. Lots of white, a little bit of black, some fabulous light fixtures, and some touches of gold. Pretty close to perfection!
New at Casa Carissa
Even the envelope is pretty...
It's the Eva Juliet print that I won over at Modern Jane!
I haven't planned the perfect permanent spot for it, but right now it's highlighted in my library shelves.
I've always loved butterflies, and I love the message (I ordered the print in French because it seemed more sophisticated!) It translates to:
"It's never too late to be what you want to be."
"There is no time limit. Start whenever you want."
Pretty fabulous, right?
You can visit the Eva Juliet Etsy Store here to see more gorgeous pieces.
So thank-you Jane! You totally made my day!
If you don't read Modern Jane already, you must! It's on my daily tour. Jane is a fellow Canadian blogger with tons of style. Here are some shots of Jane's home: